SpringBoot集成Redis - 基于RedisTemplate+Lettuce数据操作
在SpringBoot 2.x版本中Redis默认客户端是Lettuce,本文主要介绍SpringBoot 和默认的Lettuce的整合案例。@pdai
知识准备
主要基于上文中Redis和RedisTemplate的基础,还需对Lettuce有一定的理解。@pdai
什么是Lettuce?
Lettuce 是一个可伸缩线程安全的 Redis 客户端。多个线程可以共享同一个 RedisConnection。它利用优秀 netty NIO 框架来高效地管理多个连接。Github官网
Lettuce的特性:
- 支持 同步、异步、响应式 的方式
- 支持 Redis Sentinel
- 支持 Redis Cluster
- 支持 SSL 和 Unix Domain Socket 连接
- 支持 Streaming API
- 支持 CDI 和 Spring 的集成
- 支持 Command Interfaces
- 兼容 Java 8+ 以上版本
为何SpringBoot2.x中Lettuce会成为默认的客户端?
除了上述特性的支持性之外,最为重要的是Lettuce中使用了Netty框架,使其具备线程共享和异步的支持性。
- 线程共享
Jedis 是直连模式,在多个线程间共享一个 Jedis 实例时是线程不安全的,如果想要在多线程环境下使用 Jedis,需要使用连接池,每个线程都去拿自己的 Jedis 实例,当连接数量增多时,物理连接成本就较高了。
Lettuce 是基于 netty 的,连接实例可以在多个线程间共享,所以,一个多线程的应用可以使用一个连接实例,而不用担心并发线程的数量。
- 异步和反应式
Lettuce 从一开始就按照非阻塞式 IO 进行设计,是一个纯异步客户端,对异步和反应式 API 的支持都很全面。
即使是同步命令,底层的通信过程仍然是异步模型,只是通过阻塞调用线程来模拟出同步效果而已。
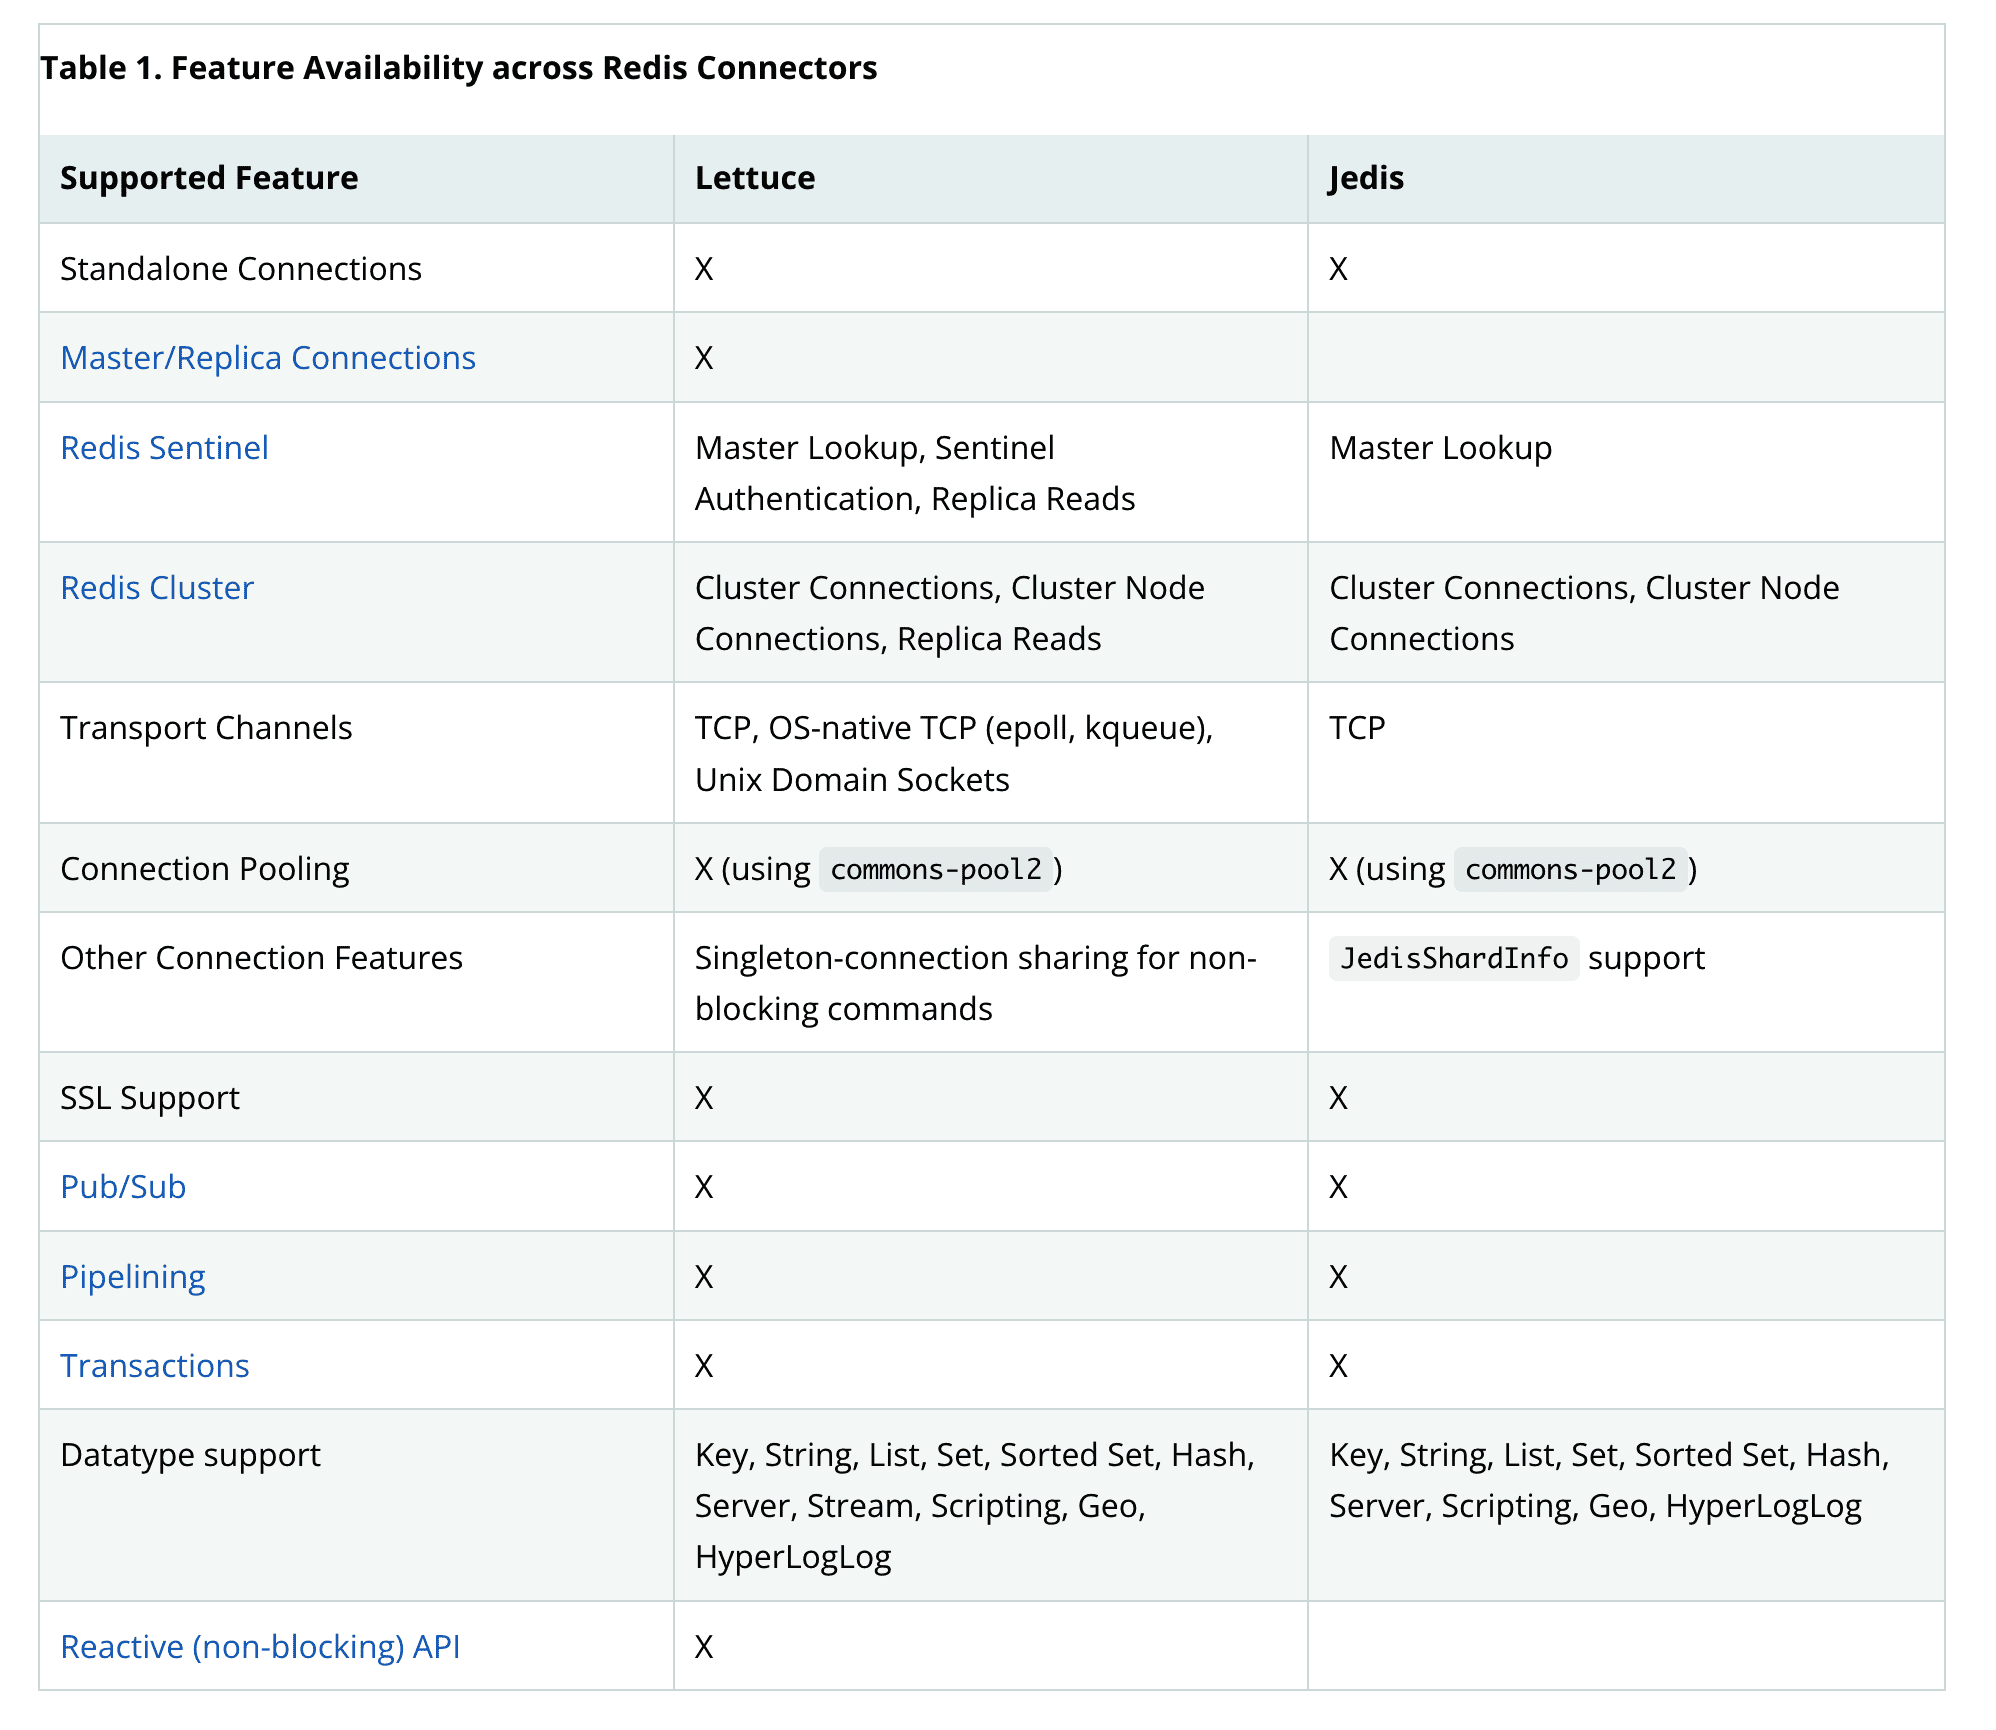
PS: Jedis和Lettuce的对比如下,参考官方文档
Lettuce的基本的API方式
依赖POM包
<dependency>
  <groupId>io.lettuce</groupId>
  <artifactId>lettuce-core</artifactId>
  <version>x.y.z.BUILD-SNAPSHOT</version>
</dependency>
- 基础用法
RedisClient client = RedisClient.create("redis://localhost");
StatefulRedisConnection<String, String> connection = client.connect();
RedisStringCommands sync = connection.sync();
String value = sync.get("key");
- 异步方式
StatefulRedisConnection<String, String> connection = client.connect();
RedisStringAsyncCommands<String, String> async = connection.async();
RedisFuture<String> set = async.set("key", "value")
RedisFuture<String> get = async.get("key")

async.awaitAll(set, get) == true

set.get() == "OK"
get.get() == "value"
- 响应式
StatefulRedisConnection<String, String> connection = client.connect();
RedisStringReactiveCommands<String, String> reactive = connection.reactive();
Mono<String> set = reactive.set("key", "value");
Mono<String> get = reactive.get("key");

set.subscribe();

get.block() == "value"
实现案例
本例子主要基于SpringBoot2+ 使用Lettuce客户端,通过RedisTemplate模板方式访问Redis数据。
包依赖
引入spring-boot-starter-data-redis包,SpringBoot2中默认的客户端是Lettuce。
<dependency>
    <groupId>org.springframework.boot</groupId>
    <artifactId>spring-boot-starter-data-redis</artifactId>
</dependency>
<dependency>
    <groupId>org.apache.commons</groupId>
    <artifactId>commons-pool2</artifactId>
    <version>2.9.0</version>
</dependency>
yml配置
如下是常用的Lettuce的使用配置
spring:
  redis:
    database: 0
    host: 127.0.0.1
    port: 6379
    password: test
    lettuce:
      pool:
        min-idle: 0
        max-active: 8
        max-idle: 8
        max-wait: -1ms
    connect-timeout: 30000ms
RedisConfig配置
通过@Bean的方式配置RedisTemplate,主要是设置RedisConnectionFactory以及各种类型数据的Serializer。
package tech.pdai.springboot.redis.lettuce.config;

import org.springframework.context.annotation.Bean;
import org.springframework.context.annotation.Configuration;
import org.springframework.data.redis.connection.RedisConnectionFactory;
import org.springframework.data.redis.core.RedisTemplate;
import org.springframework.data.redis.serializer.GenericJackson2JsonRedisSerializer;
import org.springframework.data.redis.serializer.StringRedisSerializer;

/**
 * Redis configuration.
 *
 * @author pdai
 */
@Configuration
public class RedisConfig {

    /**
     * redis template.
     *
     * @param factory factory
     * @return RedisTemplate
     */
    @Bean
    public RedisTemplate<String, Object> redisTemplate(RedisConnectionFactory factory) {
        RedisTemplate<String, Object> template = new RedisTemplate<>();
        template.setConnectionFactory(factory);
        template.setKeySerializer(new StringRedisSerializer());
        template.setHashKeySerializer(new StringRedisSerializer());
        template.setValueSerializer(new GenericJackson2JsonRedisSerializer());
        template.setHashValueSerializer(new GenericJackson2JsonRedisSerializer());
        template.afterPropertiesSet();
        return template;
    }
}
RedisTemplate的使用
我们以整个系列文章一致的UserController简单示例下
package tech.pdai.springboot.redis.lettuce.controller;


import io.swagger.annotations.ApiOperation;
import org.springframework.data.redis.core.RedisTemplate;
import org.springframework.web.bind.annotation.*;
import tech.pdai.springboot.redis.lettuce.entity.User;
import tech.pdai.springboot.redis.lettuce.entity.response.ResponseResult;

import javax.annotation.Resource;

/**
 * @author pdai
 */
@RestController
@RequestMapping("/user")
public class UserController {

    // 注意:这里@Autowired是报错的,因为@Autowired按照类名注入的
    @Resource
    private RedisTemplate<String, User> redisTemplate;

    /**
     * @param user user param
     * @return user
     */
    @ApiOperation("Add")
    @PostMapping("add")
    public ResponseResult<User> add(User user) {
        redisTemplate.opsForValue().set(String.valueOf(user.getId()), user);
        return ResponseResult.success(redisTemplate.opsForValue().get(String.valueOf(user.getId())));
    }

    /**
     * @return user list
     */
    @ApiOperation("Find")
    @GetMapping("find/{userId}")
    public ResponseResult<User> edit(@PathVariable("userId") String userId) {
        return ResponseResult.success(redisTemplate.opsForValue().get(userId));
    }

}
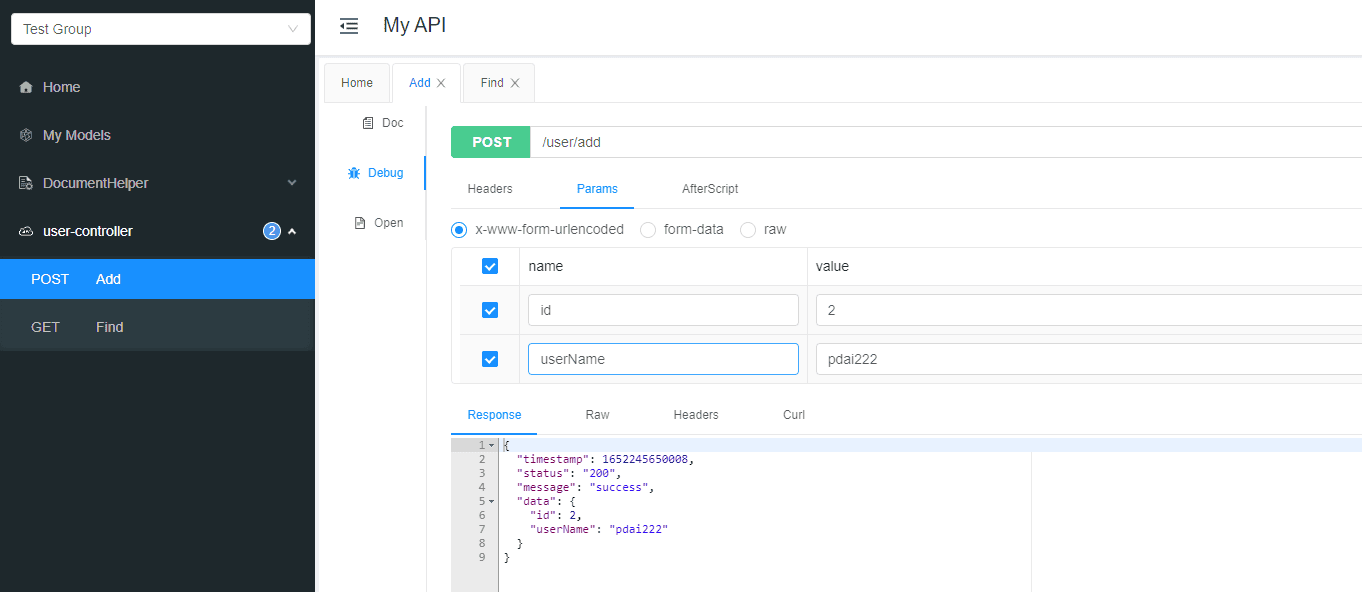
简单测试
插入数据:redisTemplate.opsForValue().set();
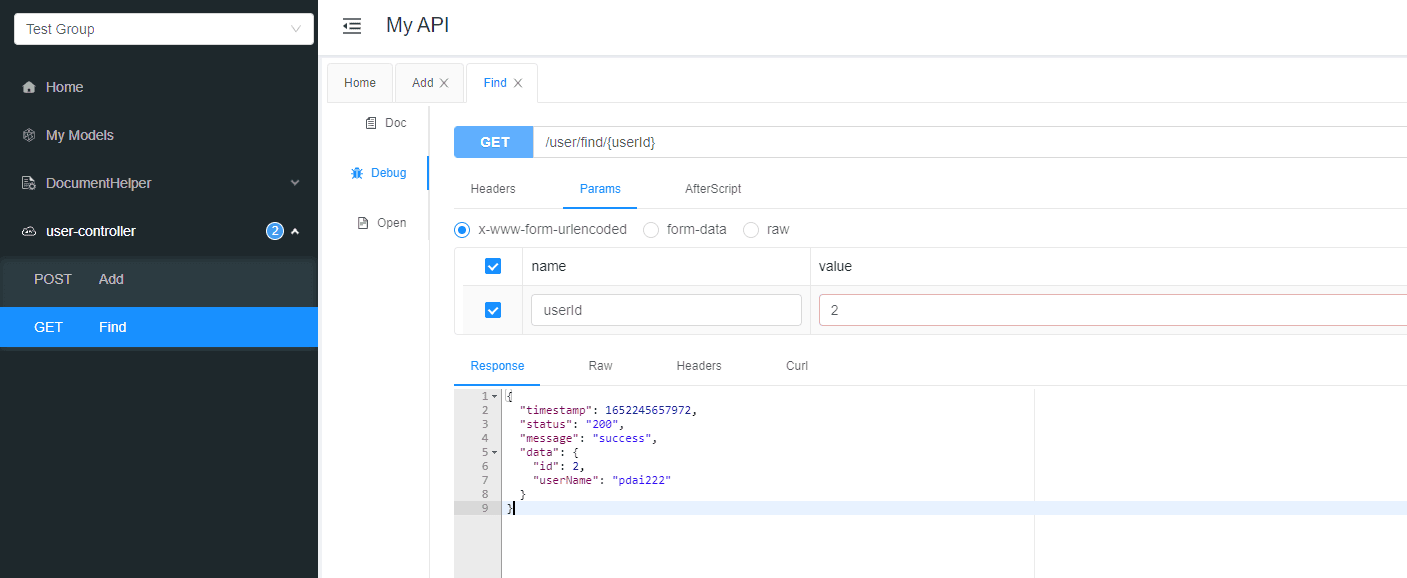
获取数据:redisTemplate.opsForValue().get();
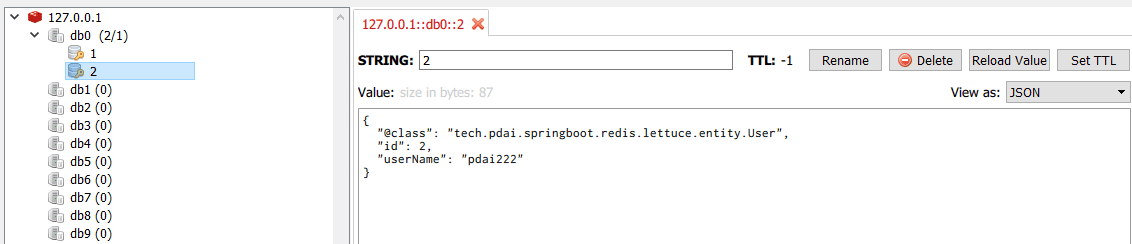
查看Redis中的数据(通过Redis Desktop Manager)
示例源码
https://github.com/realpdai/tech-pdai-spring-demos